
netcup wiki
Server

Using the rescue system
The rescue system of the netcup servers supports you in the investigation of server issues. On the one hand, it serves as a reference system: With the rescue system, you can test the stability and performance of your server well, because you can be sure that no services are running here that negatively influence the load of the system, for example. The rescue system is an excellent way to check for network problems, as it is already equipped with numerous helpful tools. If your server no longer starts correctly, e.g. because the boot loader is damaged, you can access your hard drive with the rescue system and thus retrieve your data, or enter the environment of the installed system via chroot and reinstall it.
In the following, we will introduce you in more detail to the actions you can perform with the rescue system.
Start the rescue system
You can start the rescue system in the Server Control Panel (SCP). First shut down the server completely, e.g. via the corresponding option under "Control" in the SCP. Now click on "Media" in the menu on the left of your server and then on "Rescue System" in the menu at the top right. There you need to confirm the change of the boot order and activate the rescue system by clicking on the corresponding button. You will now be shown the root password for the rescue system. Please make a note of it.
The server will then automatically be turned on and started into the rescue system.
Connection to the rescue system
You can either use the rescue system via the "screen" in the SCP, or connect to it via SSH.
Use via screen
First, you should define the keyboard layout. To set it to the German keyboard layout, simply press d once.
To get access to the shell afterwards, press the enter key without entering anything first.
Use via SSH
When connecting via SSH, use the user root and the previously displayed root password to connect.
Checking for network problems
If you suspect a network problem with your server, the best way to check is with the rescue system started.
If you experience:
- Increased ping times of 100 milliseconds or more,
- Packet loss on the route to the vServer, possibly even at the last hop,
this may indicate problems. In this case, we recommend checking via MTR and rescue system.
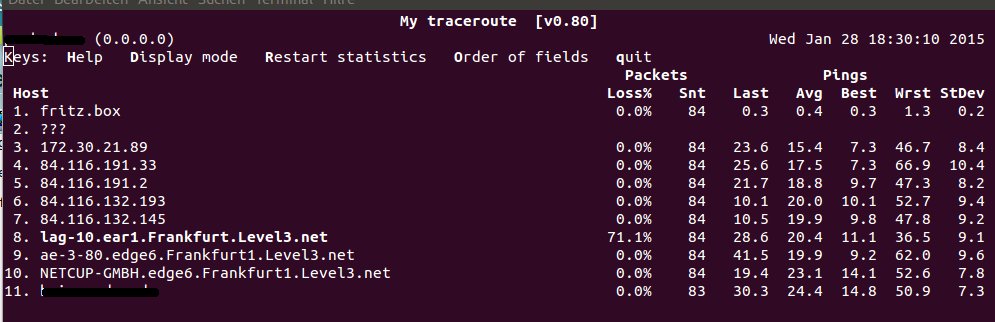
Testing with MTR

You can get your server IP in the SCP under "Network".
Use MTR (My Traceroute) or WIN-MTR to check whether packet loss occurs on the route to the hops. To do this, please perform at least 500 pings on both the server and the corresponding host using the following terminal command:
mtr <server_ip>
Check with Iperf3
Next, run Iperf3 via terminal. This will give us information about the connection to and from your server:
I am using IPv4
First run this command:iperf3 -c speedtest.wtnet.de -p 5200 -P 10 -4
Then run this command:
iperf3 -c speedtest.wtnet.de -p 5200 -P 10 -4 -R
I am using IPv6
First run this command:iperf3 -c speedtest.wtnet.de -p 5200 -P 10 -6
Then run this command:
iperf3 -c speedtest.wtnet.de -p 5200 -P 10 -6 -R
Message to netcup
Contact our support. The ticket should please include:
- The customer number
- The server name and/or IP address
- The output of MTR
- The output of Iperf3
- Information on whether the rescue system has been booted into.
To assist us in processing your ticket, please provide us with the data output of MTR and Iperf3 as a text file in the attachment. We will then process your request as soon as possible.
Fixing file system errors with fsck
If you get file system errors when booting your system, it may be a good idea to initiate a file system repair with fsck.

The following steps may trigger data loss if the file system is significantly damaged. Execution is at your own risk and is only recommended if you have extensive knowledge of Linux system administration and the consequences of executing the following command. Under no circumstances should you proceed without a backup of your data!
First use the command lsblk to get an output of all hard disks and partitions of the system.
Next, you can start the fsck process for the affected partition. The following command will immediately check the partition for file system errors and fix them without prompting.
fsck -C0 -y -f /dev/vda3
Replace /dev/vda3 with the partition you want to check.
Accessing your hard disk
If your server no longer starts correctly, you can use the rescue system to access the hard disk and thus the data of the system. By default, you do not have immediate access to the hard disk of your server after starting the rescue system. You must first mount it.
To find out the name of your hard disk and the partitions, we recommend using the program lsblk. After executing the lsblk command, you will get an output of all hard disks of your system and their partitions.
If you now want to mount one of the partitions, execute the following command, for example:
mount /dev/vda3 /mnt.
Replace /dev/vda3 with the partition that you want to mount.
If you then run ls /mnt, for example, you should get the directory contents of / of the mounted partition. You can now already access your data this way.
Access to the system via chroot
Depending on your individual configuration, you can now access your installed system via chroot. For example, you can change your root password if you have forgotten it, or reinstall the boot loader if it is damaged.
The following procedure is merely an example based on a possible system configuration. The exact procedure depends on your individual configuration and generally requires advanced knowledge of Linux system administration.
Mount the required partitions
We have already mounted the / partition in a previous step.
If /boot is on a separate partition, you should also mount it at /boot of the already mounted partition, i.e. under /mnt/boot:
mount /dev/vda2 /mnt/boot.
In the next step you should mount some partitions that are needed for proper functionality of the chroot environment:
mount -t proc proc /mnt/proc
mount -t sysfs sys /mnt/sys
mount -o bind /dev /mnt/dev
Change to the chroot
Now you can change to the chroot:
chroot /mnt /bin/bash.
You can now work in it and, for example, change your root password or reinstall the boot loader.
It may be necessary to configure name servers within the chroot under /etc/resolv.conf in order to be able to use the network within it correctly.
Exiting the chroot
You can exit the chroot with exit.
Afterwards you should unmount all mounted partitions with umount:
umount /mnt/boot # (If you have mounted /boot)
umount /mnt/{proc,sys,dev}
umount /mnt
Deactivate the rescue system
The rescue system has to be deactivated manually after completed work. To do this click on the corresponding button in the information box on top notifying about the active rescue system. The server will then shut down and the boot order change reverted to the original state. The server has to be started manually afterwards.