
netcup wiki
Domain

DNS Settings

This section is intended only for experienced individuals and can cause problems if used improperly.

Using netcup domains with netcup products such as netcup Server, SOGo or Webhosting is straightforward and requires no DNS changes here. Just refer to the linked instructions for this.
Inclusive domains with netcup web hosting are automatically connected to the booked web hosting instance.
You can adjust the DNS entries of your domain at any time. For instance, this is necessary to connect to web hosting or SOGo solutions from other providers.
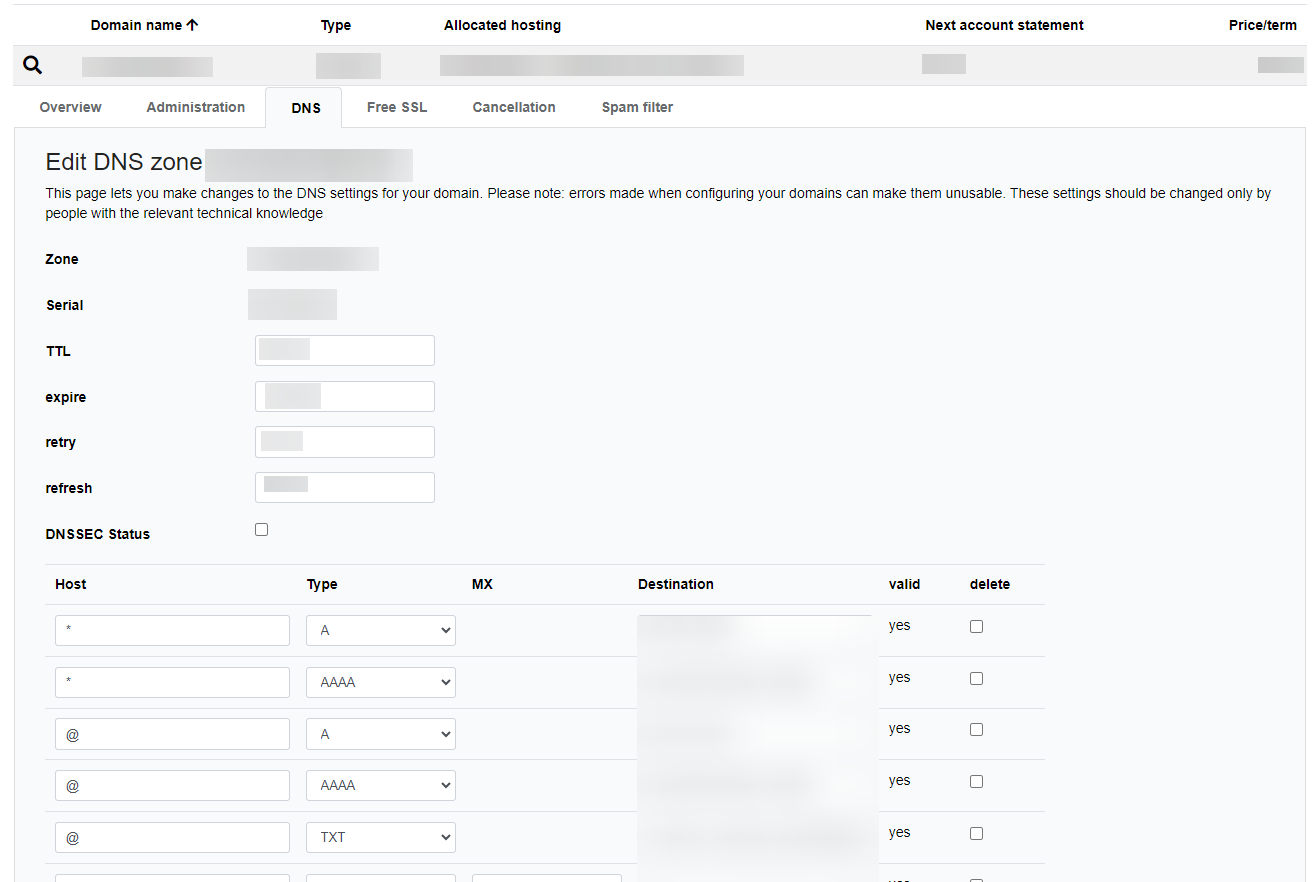
To do this, open your Customer Control Panel (CCP) and go to the "Domains" section in the navigation bar on the left side. Find the domain you want to make changes to and click on the magnifying glass next to the domain. Then switch to the DNS tab.
Editing DNS Entries
Introduction
In this guide, you will learn how to edit the DNS entries of your domain.
Table of DNS Entries
The @ symbol represents the main domain (e.g., domain.tld).
The DNS tab is structured in the form of a table:
| Entry | Description |
|---|---|
| Host | Subdomain or Wildcard (*). |
| Type | Type of entry. |
| MX | For type "MX", a priority is set here. |
| Destination | Target of the entry. |
| Valid | Indicates the validity of an entry. |
Examples of Valid Entries
These are just examples. You can, for example, connect your domains with Google Workspace or Protonmail and still have the A-records point to netcup IPs.
Below are some examples of correctly formatted DNS entries.
A-Records
| Type | Description | Target IP |
|---|---|---|
| Wildcard | Applies to all subdomains of the zone. | 78.47.133.14 |
| Main Domain | Specifically applies to the main domain. | 78.47.133.14 |
MX Records
| Priority | Description | Target |
|---|---|---|
| 10 | Forwarding to a specific server. | mail.qualitaet.ws |
SRV Records
| Host | Type | Destination |
|---|---|---|
| _Service._Protocol | SRV | Priority Weight Port Target |
Glue Records
| Type | Description | Additional information |
|---|---|---|
| Glue | When nameserver and domain are in the same zone. | Required IP of the nameserver |
CNAME Records
| Type | Description | Additional information |
|---|---|---|
| CNAME | Clones the DNS of another domain. | - Cannot be created directly on the main domain (@), as this would cause conflicts with the SOA and NS records. - A CNAME record can only be created for a hostname if there are no other DNS records for that hostname. If another record already exists for the hostname, a CNAME cannot be added. |
Instructions
Save Changes
Global DNS servers can take up to 48 hours to recognize your changes, so we ask for your patience.
- After editing, click on "Save DNS Records".
- The system checks your entries for semantic correctness. Errors are displayed in a red box.
- Semantically correct changes are confirmed with a green box and are usually updated within about 10 minutes.
Resetting
Global DNS servers can take up to 48 hours to implement the reset, so we ask for your patience.
If you've made an error, you can easily reset the DNS entries.
- For this, check the box for "Set standard DNS settings".
- Then click on "Save DNS Records".
- The reset is usually updated within about 10 minutes.
Nameserver
By default, you use netcup's nameservers.
Own Nameserver
If ignored, your domain may not be accessible during the transition phase.
Global DNS servers can take up to 48 hours to implement the reset, so we ask for your patience.
Follow these steps to add your own nameserver entries. You will receive this data from your nameserver provider.
- Switch in the dropdown menu to "own nameserver".
- Now enter the hostname in the table above under Hostname. IPv4 and/or IPv6 addresses can also be specified if required by your provider.
- Click on "Save Nameserver".
Back to netcup's Nameserver
Global DNS servers can take up to 48 hours to implement the reset, so we ask for your patience.
- Switch in the dropdown menu to "netcup Nameserver".
- Click on "Save Nameserver".
DNSSEC
DNSSEC (Domain Name System Security Extensions) helps protect certain data when communicating with DNS servers.
netcup's DNSSEC
If ignored, your domain may not be accessible during the transition phase.
Global DNS servers can take up to 48 hours to implement the reset, so we ask for your patience.
- Activate DNSSEC by clicking on the "DNSSEC Status" checkbox.
- Then click on "Save DNS Records".
DNSSEC with external nameservers
If ignored, your domain may not be accessible during the transition phase.
Global DNS servers can take up to 48 hours to implement the reset, so we ask for your patience.
The zone must be correctly signed by your nameserver before you can send the information to the registrar.
If using an external nameserver, you can, of course, also activate DNSSEC. You will receive this data from your nameserver provider.
- External nameservers should already be set up.
- Click on "+ New DNSSEC Entry".
- Enter the public key, flags, and algorithm.
Switching back to netcup's DNSSEC
If ignored, your domain may not be accessible during the transition phase.
Global DNS servers can take up to 48 hours to implement the reset, so we ask for your patience.
- Delete all DNSSEC keys in the panel.
- Retain keys in your nameserver for double TTL (usually 48 hours).
- Switch to netcup's nameservers and activate DNSSEC by clicking on the "DNSSEC Status" checkbox.
- Then click on "Save DNS Records".