
netcup wiki
Server

Partitioning of a VPS or root server
These instructions refer exclusively to the partitioning of KVM servers and cannot be used for classic vServers.

Check whether the instructions apply to your system. Errors when modifying the partitioning can lead to data loss. Be sure to create an up-to-date backup of your system before continuing. Here you can find out how to create a snapshot.
Select the method you want to use for server partitioning:
Partitioning with the GParted Live CD (recommended)
Partitioning via the command line
1 Partitioning with GParted
If you have no experience with the partitioning of servers, we recommend using the GParted Live CD. It allows partitioning via a graphical user interface.
Errors when modifying the partitioning can lead to data loss. Be sure to create an up-to-date backup of your system before continuing.
1.1 Getting started
- Log in to the Server Control Panel (SCP).
-
Go to Media -> DVD drive.
-
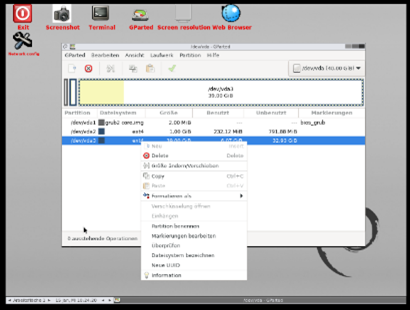
Start GParted.
-
Make sure that you have selected the correct hard drive in the top right window.
1.2 Resize partition
- You can now see all the partitions on the hard drive.
-
Select the partition you want to resize from the list.
-
Right-click and select Resize/Move.
-
Modify the size either with the slider or enter the desired value manually.
-
Confirm the changes by clicking on Resize/Move.
-
Click on the green checkmark at the top to apply your changes.
1.3 Create new partition
-
Make sure that you either have unallocated space on your hard drive or that you shrink an existing partition to free up space.
-
Right-click on the entry with the free space and select New.
-
Adjust size if necessary.
-
Confirm by clicking the Add button.
-
Click on the green checkmark at the top to apply your changes.
A new partition must later be mounted in the operating system. Only then you can access the partition.
2 Partitioning via the command line
Check whether the instructions apply to your system. Errors when modifying the partitioning can lead to data loss. Be sure to create an up-to-date backup of your system before continuing.
2.1 Getting started
These steps are necessary to determine whether FDSIK or GDSIK must be used in the following process.
-
Enter the command
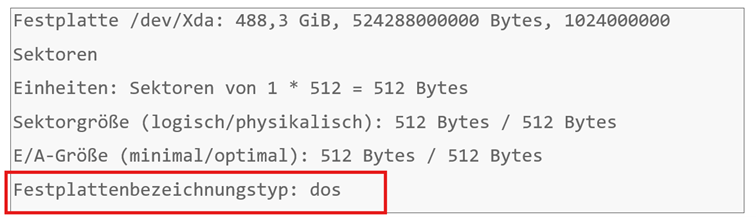
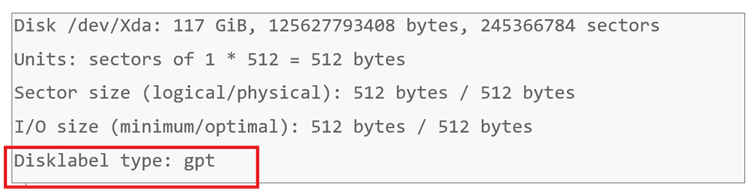
fdisk -lto determine the partition table that is currently in use. -
As a result, you will receive one of the following responses:
or
-
If your disk label type is "dos", go to: Partitioning with FDISK and MBR partition table
-
If your disk label type is "gpt", go to: Partitioning with GDISK and GPT partition table
2.2 Partitioning with FDISK and MBR partition table
Check whether the instructions apply to your system. Errors when modifying the partitioning can lead to data loss. Be sure to create an up-to-date backup of your system before continuing.
2.2.1 Find device
- Verify the name of the hard drive in use. Enter the following commands:
ls -la /dev/vda
and/or
ls -la /dev/sda
-
An error message appears for one of the two commands stating that the file was not found. Your hard drive is therefore called "vda" or "sda".
-
Throughout the rest of the article, the hard drive will be referred to as "Xda". Replace the "X" with the name of your hard drive:
„s“ for /dev/sda
or
„v“ for /dev/vda.
-
Throughout the rest of the article, the partition will be referred to as "0". Replace "0" with the corresponding partition number you want to modify.
2.2.2 Existing partitions
- Enter the command
df -hto display information about hard drive usage and file systems:
root@v123:~# df -h
Filesystem            Size  Used Avail Use% Mounted on
/dev/mapper/volume-root
                       39G  707M   36G   2% /
tmpfs                 7.9G     0  7.9G   0% /lib/init/rw
udev                  7.9G  116K  7.9G   1% /dev
tmpfs                 7.9G     0  7.9G   0% /dev/shm
/dev/Xda1             248M   26M  210M  11% /boot
- Use the command
fdisk -lto retrieve information about the available disk space:
root@v123:~# fdisk -l

Disk /dev/Xda: 251.3 GB, 251255586816 bytes
[...]

   Device Boot      Start         End      Blocks   Id  System
/dev/Xda1   *           3         523      262144   83  Linux
Partition 1 does not end on cylinder boundary.
/dev/Xda2             523       83221    41679872   8e  Linux LVM
Partition 2 does not end on cylinder boundary.

Disk /dev/dm-0: 42.2 GB, 42165338112 bytes
[...]
2.2.3 Partitioning
2.2.3.1 Rescue system
To modify the partitioning of the hard drive, you must boot the system in the rescue system:
-
Change the boot order of the KVM server so that it boots from the network first. You can adjust these settings in the SCP under Settings -> Boot order.
-
Activate the rescue system under Media -> Rescue system and follow the instructions to restart the system.
-
Connect to the rescue system using the temporary password displayed.
2.2.3.2 Increase partition size
-
Start
fdisk. -
Answer the setup as follows: [u], [c], [d], [0], [n], [p], [0], [Enter], [Enter], [w]
Replace "0" with the desired partition number.
Only set the DOS compatibility mode if it is absolutely necessary. Otherwise, the assignment of the sectors is no longer correct.
root@v123:~# fdisk /dev/Xda

WARNING: DOS-compatible mode is deprecated. It's strongly recommended to
         switch off the mode (command 'c') and change display units to
         sectors (command 'u').

Command (m for help): u
Changing display/entry units to sectors

Command (m for help): c
DOS Compatibility flag is not set

Command (m for help): d
Partition number (1-4): 0

Command (m for help): n
Command action
   e   extended
   p   primary partition (1-4)
p
Partition number (1-4): 0
First sector (526336-490733567, default 526336):
Using default value 526336
Last sector, +sectors or +size{K,M,G} (526336-490733567, default 490733567):
Using default value 490733567

Command (m for help): w
The partition table has been altered!

Calling ioctl() to re-read partition table.
Syncing disks.
- Use the command
fsck -C0 -y -f /dev/Xda0to check the file system for errors and repair it if necessary (replace “Xda0” with the hard disk name and the partition number):
root@v123:~# fsck -C0 -y -f /dev/Xda0

[...]

/dev/Xda2: 53498/1242480 Dateien (0.1% nicht zusammenhängend), 313172/5065216 Blöcke
root@v123:~# resize2fs -p /dev/Xda2
resize2fs 1.41.12 (17-May-2010)
Die Grösse des Dateisystems auf /dev/Xda2 wird auf 30641664 (4k) Blöcke geändert.

Start von Durchgang 1 (max = 781)
Vergrößere die Inode-TabelleXXXXXXXXXXXXXXXXXXXXXXXXXXXXXXXXXXXXXXXX
Das Dateisystem auf /dev/Xda2 ist nun 30641664 Blöcke groß.
2.2.4 Final steps
-
Restart the system and connect to the productive system.
-
Enter the command
df -hagain. The output of the available space should now look like this:
root@v123:~# df -h
Filesystem      Size  Used Avail Use% Mounted on
/dev/Xda2       117G  2.6G  109G   3% /
udev            2.0G  4.0K  2.0G   1% /dev
tmpfs           791M  240K  791M   1% /run
none            5.0M     0  5.0M   0% /run/lock
none            2.0G     0  2.0G   0% /run/shm
/dev/Xda1       112M   32M   75M  30% /boot
2.3 Partitioning with GDISK and GPT partition table
GPT has the advantage that you can manage partitions with capacity of more than 2TB.
Check whether the instructions apply to your system. Errors when modifying the partitioning can lead to data loss. Be sure to create an up-to-date backup of your system before continuing.
2.3.1 Find device
- Verify the name of the hard drive in use. Enter the following commands:
ls -la /dev/vda
and/or
ls -la /dev/sda
-
An error message appears for one of the two commands stating that the file was not found. Your hard drive is therefore called "vda" or "sda".
-
Throughout the rest of the article, the hard drive will be referred to as "Xda". Replace the "X" with the name of your hard drive:
„s“ for /dev/sda
or
„v“ for /dev/vda.
-
Throughout the rest of the article, the partition will be referred to as "0". Replace "0" with the corresponding partition number you want to modify.
2.3.1 Existing partitions
- Enter the command
df -hto display information about hard drive usage and file systems:
Dateisystem    Größe Benutzt Verf. Verw% Eingehängt auf
/dev/Xda3       5,3G    1,2G  3,9G   23% /
udev             10M       0   10M    0% /dev
tmpfs           1,2G    8,4M  1,2G    1% /run
tmpfs           3,0G       0  3,0G    0% /dev/shm
tmpfs           5,0M       0  5,0M    0% /run/lock
tmpfs           3,0G       0  3,0G    0% /sys/fs/cgroup
- Use the command
fdisk -lto retrieve information about the available disk space:
Disk /dev/Xda: 117 GiB, 125627793408 bytes, 245366784 sectors
Units: sectors of 1 * 512 = 512 bytes
Sector size (logical/physical): 512 bytes / 512 bytes
I/O size (minimum/optimal): 512 bytes / 512 bytes
Disklabel type: gpt
Disk identifier: 2AE9B363-C537-4A7A-814E-E2ADBB5FA4BC

Device        Start       End   Sectors   Size Type
/dev/Xda1        34     19531     19498   9,5M BIOS boot
/dev/Xda2     19584   8006783   7987200   3,8G Linux swap
/dev/Xda3   8006784  19530879  11524096   5,5G Linux filesystem
/dev/Xda4  19530880 245366719 225835840 107,7G Microsoft basic data
2.3.3 Partitioning
2.3.3.1 Rescue system
To modify the partitioning of the hard drive, you must boot the system in the rescue system:
-
Change the boot order of the KVM server so that it boots from the network first. You can adjust these settings in the SCP under Settings -> Boot order.
-
Activate the rescue system under Media -> Rescue system and follow the instructions to restart the system.
-
Connect to the rescue system using the temporary password displayed.
2.3.3.1 Increase partition size
-
Start GDISK using the command
gdisk /dev/Xda. -
Confirm all entries from GDISK with <ENTER>.
-
Press the <p> key to list the existing partitions.
Disk /dev/Xda: 245366784 sectors, 117.0 GiB
Logical sector size: 512 bytes
Disk identifier (GUID): 2AE9B363-C537-4A7A-814E-E2ADBB5FA4BC
Partition table holds up to 128 entries
First usable sector is 34, last usable sector is 245366750
Partitions will be aligned on 2-sector boundaries
Total free space is 83 sectors (41.5 KiB)

Number  Start (sector)    End (sector)  Size       Code  Name
   1              34           19531   9.5 MiB     EF02  primary
   2           19584         8006783   3.8 GiB     8200  primary
   3         8006784        19530879   5.5 GiB     8300  primary
   4        19530880       245366719   107.7 GiB   0700  primary
During the installation of one of our pre-configured images, a separate partition is created for the disk space not used by the operating system. In this example, it is partition number 4. However, the partition number may vary with other images.
- Delete partition number 4 (= unused space in this example).
Command (? for help): d
Partition number (1-4): 4
- Delete the partition you want to increase:
Command (? for help): d
Partition number (1-3): 3
- Create partition 3 with the new size:
Command (? for help): n
Partition number (3-128, default 3):
Input: <ENTER>
First sector (19532-245366750, default = 8006784) or {+-}size{KMGTP}:
Input: <ENTER>
Last sector (8006884-245366750, default = 245366750) or {+-}size{KMGTP}:
Input: +50G <ENTER>
The partition will therefore be 50 GB in size. Alternatively, you can select the suggested default values to partition the entire hard drive capacity. If you confirm with <ENTER>, the entire capacity (in this case 8300) will be used. If you want to determine the size yourself, enter the desired numerical value.
Current type is 'Linux filesystem'
Hex code or GUID (L to show codes, Enter = 8300):
Input: <ENTER>
Changed type of partition to 'Linux filesystem'
- Press the <p> key again to display the newly partitioned area:
Disk /dev/Xda: 245366784 sectors, 117.0 GiB
Logical sector size: 512 bytes
Disk identifier (GUID): 2AE9B363-C537-4A7A-814E-E2ADBB5FA4BC
Partition table holds up to 128 entries
First usable sector is 34, last usable sector is 245366750
Partitions will be aligned on 2-sector boundaries
Total free space is 152 sectors (76.0 KiB)

Number  Start (sector)    End (sector)  Size       Code  Name
   1              34           19531   9.5 MiB     EF02  primary
   2           19584         8006783   3.8 GiB     8200  primary
   3         8006884       245366750   50 GiB   8300  Linux filesystem
- Press the <w> key to write the changes to the partition table:
Final checks complete. About to write GPT data. THIS WILL OVERWRITE EXISTING
PARTITIONS!!
Do you want to proceed? (Y/N):
Input: y <ENTER>
2.3.4 Final steps
- Adjust the file system:
resize2fs /dev/Xda3 <ENTER>
- Enter the command
df -hagain to display the successful increase of /dev/xda3.
Dateisystem    Größe Benutzt Verf. Verw% Eingehängt auf
/dev/Xda3        50G    1,2G   46G    3% /
udev             10M       0   10M    0% /dev
tmpfs           1,2G    8,4M  1,2G    1% /run
tmpfs           3,0G       0  3,0G    0% /dev/shm
tmpfs           5,0M       0  5,0M    0% /run/lock
tmpfs           3,0G       0  3,0G    0% /sys/fs/cgroup