netcup wiki
General

Identity verification with Stripe
Alternatively, you have the option of making a prepayment. Note that in some cases, the prepayment option may not be available for security purposes. Find out more.
Why does netcup carry out verification?
The reason we require verification is to ensure that no one misuses your identity and that you are protected against fraud or identity theft. At the same time, we can guarantee you a trustworthy service and ensure that your data remains secure. After you receive the email asking you to verify your account, you have 14 days to complete it.
Can I switch to prepayment after choosing identity verification?
If you have already selected identity verification with Stripe, you can still switch to prepayment afterwards. To do so, click on the link in the verification email again, select Back and then click Prepayment. Note that it is currently not possible to switch from prepayment to identity verification.
How does the verification process work?
Stripe captures images of the front and back of your official identity document and verifies their authenticity. Then, it takes photos of your face and compares them with the ID to ensure that the document belongs to you. The system then checks whether the information about your name, date of birth and ID number is correct.
Preparations
- Use a device with a camera for verification.
- Have your identity document or a scanned copy of it ready.
- Follow the instructions in the email to start the verification process.
Verification with Stripe
-
Read the information on the processing of your data and click on Agree and Continue.
-
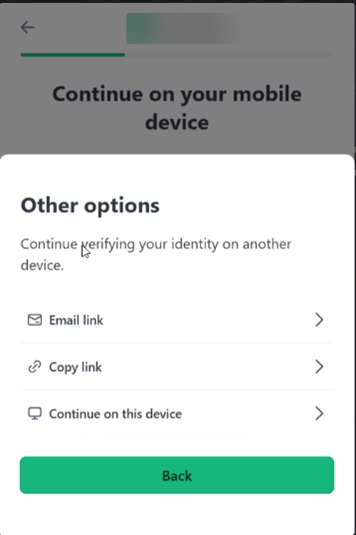
Choose the device you want use for the verification:
- If you want to switch to your mobile device or another device, scan the QR code or click on Other options to copy the link or send it by email.
- If you want to stay on your current device, click on Other options and then on Continue on this device.
-
Follow the instructions and take the required photos of your ID. Alternatively, you can click on Having trouble? to select and upload a scanned copy of your ID.
-
Click on Submit photo or on Retake photo in case not all details are visible and clear.
-
Read the information on the next step and click on Continue.
-
The application now automatically takes 3 photos of your face.
-
Your verification has been submitted.
-
Click on Done.
-
The verification process is complete. You will receive further information via email.
Verification successful
After successful verification, the order process will continue. You will receive a notification once your order has been set up.Verification rejected
There may be various reasons why your verification was rejected, such as:- Invalid or illegible identity documents
- Expired identity document
- Use of an identity document beloging to another person
- Not meeting the minimum age requirement
- Mismatched data (name, address, date of birth) compared to the data we have on file
- Geographical restrictions: Depending on the country, different requirements for identity documents apply. For more information, see:
Accepted verification documents by country
List of countries supported by Stripe
- Identity document in different script: Stripe does not support extraction of document fields written in Arabic, Chinese, Cyrillic, Greek, Hebrew, Korean, Tamil, or Thai script.
Review your details and try again if necessary.
