
netcup wiki
Webhosting

Reseller Webhosting
The reseller Webhosting from netcup offers you the possibility to sell our high-quality cloud Webhosting to your customers. You have extensive configuration options via the Plesk interface. The following instructions will show you how you can use your new cloud Webhosting product optimally.
Overview and login
You can access your reseller Webhosting plan via your CCP or directly via the URL sent to you by email during the order process. You can also view this in the CCP and pass it on to your customers, for example. Please log in to your CCP, click "Products" on the left and then click the magnifying glass in front of the reseller Webhosting plan.
Using the "Auto Login" button, you can log in to the Plesk interface without entering a password. Alternatively, you can click "Change Password" to set a password for your reseller access so that you can log in directly to the plan via the displayed URL without detour via the CCP.
Permissions Structure
User roles
You are logged in as a reseller in the Plesk interface. Plesk has a multi-level user role concept, with each user role being able to exist multiple times and receiving its own access data:
- Administrators: Administrators have the highest rights in the user interface. For reseller Webhosting, netcup is the only administrator.
- Resellers: Resellers can create customers and thus offer hosting subscriptions. For netcup reseller hosting, you are the reseller yourself.
- Customers: Customers can only access their own subscriptions. Customers represent the lowest user role in Plesk.
Subscriptions
Subscriptions are the plans/Webhosting packages booked by your customers.
Service packages
Service packages represent your plans: In a service package you define the services that customers should have available in subscriptions, i.e. a booked plan. A subscription is therefore assigned a service package that defines the services included in the subscription.
Planning
It is important that you plan well before creating the service packages. First, you must not exceed the plan limits of your netcup reseller plan with a service package. Otherwise, you will receive errors later when creating and assigning subscriptions to the respective service package. You must also consider that all subscriptions together should not exceed the plan limits. Therefore, your service plans must be designed so that you can assign them to your planned number of subscriptions without exceeding the netcup plan limits.
Changing roles
As a reseller, you can always switch to your customers' view. To do this, click either "Log in as customer" under "Customers" next to the desired customer. You can also click "Manage in customer panel" next to the created subscription or domain under "Subscriptions" or "Domains". This will then show you this from the customer's perspective. To switch back to the reseller account, click "Return to Administrator" at the top right.
Summary
Resellers have customers. Customers in turn have subscriptions that contain their domains. These subscriptions have a service package as a template that defines which services the respective subscription includes. Of course, there are exceptions to this. For example, resellers can also have subscriptions directly. Basically, however, the described structure is the usual one.
My first Webhosting customer
In the following parts of the instructions, we will go into detail about the individual options that the Plesk interface offers you for managing your customers, service packages and subscriptions. This section, on the other hand, is intended to show in a simplified manner how you can get started quickly: How do you create your first customer, your first service package and your first subscription?
Create customer
Click "Customers" on the left and then "Add Customer". In the first part of the form under "Contact Details", enter the customer's contact details. The required fields are marked with an "*".
Under "Access to Plesk" you define the access data for the customer. This allows the customer to log in to the Plesk interface independently.
If you wish, you can create a subscription immediately. We will deactivate this option as part of these instructions in order to explain the individual steps, including creating subscriptions and service packages, in more detail. Remove the checkmark next to "Create subscription for customer". Click "OK" to create your first customer.
Create service package
To create a service package, click "Service Packages" on the left and then "Add Package". Creating a service package is a process that provides you with a wide range of configuration options. For information on the resources and permissions that can be set, we recommend consulting the Plesk manual.
Please note that you should not exceed the plan limits of your reseller plan in a service package. If you do, you will receive a corresponding message when creating subscriptions. The subscription values will then be set to the maximum allowed and the subscription will not be synchronized with the service plan.
Don't forget to give your service package a suitable name (e.g. the name of your plan) in addition to "Service Package Name" and then save it with a click on "OK".
Create subscription
Your created customer should now receive a subscription based on the plan services defined in the service package, in which they can host their content. To do this, first click "Customers" on the left, then the customer's name and then the "Subscriptions" tab. Then select "Add Subscription".
First you have to specify the main domain of the subscription. This is the domain that is first stored in the subscription. Each subscription requires a domain.
Each reseller plan includes one IPv4 address. This should be selected next to "IPv4 Address". For IPv6, on the other hand, you have your own address available for each customer. Here you can select an address of your choice. If you select "No specification", the subscription will not be reachable via IPv6.
Enter the data for the system user of the subscription under "Username" and "Password". This can connect to the Webhosting server via FTP, for example, to transfer files. Next to "Service Package" now select the previously created plan.
You now have the option to select the option "Continue adjusting the subscription parameters after creation. Please note that this will lock the subscription for synchronization.". This allows you to individually adjust the settings from the service package after creating the subscription. However, synchronization between the service package and subscription is stopped. So if you make changes to the service package later, they will not be applied to the modified subscription. We therefore advise against selecting this option.
You can now choose whether you want to receive a free "Let's Encrypt" certificate for the domain or use Git. Then you can create the subscription by clicking "OK".
You may now receive the message "Synchronization failed". This happens if the underlying service package has set limit values that exceed the limits of your netcup reseller plan. Plesk will then set the maximum allowed values for the subscription. However, the subscription will not be synchronized with the service package. In this case, make a note of the values shown in the message, proceed with "OK", go to the created service package and set the plan-compliant limit values there. Please note that the values apply to each assigned subscription, which means you must plan so that you do not exceed the limits of your plan in total (with all subscriptions).
You can then restart synchronization with the service package under "Subscriptions" -> click on the subscription -> "Synchronization" (bottom right in the "Account" box).
DNS records
What DNS records should the customer now configure for their domains in the subscription? We recommend checking the domain directly to see what IP addresses are being used. The IP addresses are displayed in the Webhosting Control Panel (WCP) at the bottom of the dashboard next to the domain.
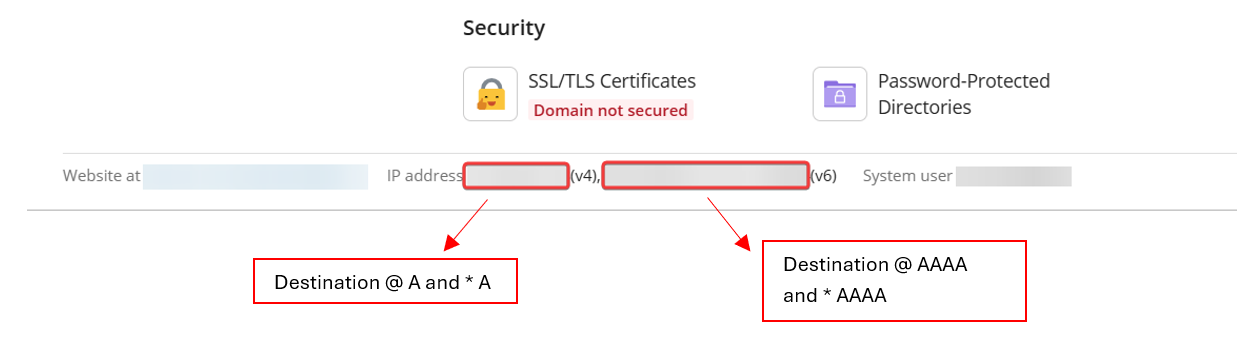
Example DNS records could be as follows:
Web server
| Host | Type | Destination | Description |
|---|---|---|---|
| @ | A | 1.2.3.4 | Root domain points to the web hosting server IPv4. |
| @ | AAAA | 2001:DB8::1 | Root domain points to the web hosting server IPv6. |
Mail server
| Host | Type | Destination | Description |
|---|---|---|---|
| @ | MX (10) | mail.mydomain.de (mydomain.de is to be replaced) | Indicates how the mail server can be reached. |
| @ | TXT | v=spf1 mx a include:_spf.webhosting.systems ~all | SPF - allows emails to be sent from the server specified in the A record and in the MX record, as well as from our mail relay. This makes it possible for third parties to recognize whether the email actually comes from the domain owner. |
| key1._domainkey | CNAME | key1._domainkey.webhosting.systems | DKIM – adds a digital signature to ensure that emails have not been altered and come from the rightful sender. |
| key2._domainkey | CNAME | key2._domainkey.webhosting.systems | DKIM – adds a digital signature to ensure that emails have not been altered and come from the rightful sender. |
Web and mail server
| Host | Type | Destination | Description |
|---|---|---|---|
| * | A | 1.2.3.4 | All subdomains not defined separately point to the web hosting server IPv4. |
| * | AAAA | 2001:DB8::1 | All subdomains not defined separately point to the web hosting server IPv6. |

Both DKIM records (key1 and key2) are required for complete security.
Note that the records will only work as intended if the default DNS settings are used and emails are sent exclusively via the product's mail server. Emails sent via alternative methods such as the web server (e.g. phpmail or sendmail) or an external mail server are excluded and not valid.
Hosting services
Customers
Under "Customers" you can create users with the user role "Customer", change their status or remove them.
By clicking on a created customer in the list, you will receive an overview of the associated domains and subscriptions and can directly add new elements for this customer. In the box on the right, you can change the customer's status, change their login details or remove the customer. You can also switch to the customer view directly from this view by clicking "Log in as customer".
Add customer
By clicking "Add Customer" you can create a new customer in Plesk. If desired, a subscription can be created at the same time and assigned to the customer.
Change status
Here you can block or activate selected customers. By blocking, the customer will no longer be able to log in to the Plesk user interface. The customer's subscriptions will also be blocked. Websites and emails will then not be reachable.
Remove
With "Remove" you can remove the selected customers. This will also delete the assigned subscriptions. Thus, deleting a customer will completely delete all associated subscriptions, websites, email addresses and databases.
Domains
Under "Domains" you will find an overview of all domains created in your reseller hosting, regardless of which subscription they are created in.
Click on a domain in the list to display it in the Plesk panel. You can then change settings on it. Please note that the domain is displayed to you with the rights of your reseller account and you can therefore make more changes than your customer may be allowed according to the service package. If you want to view the domain from the customer's perspective and possibly make changes, click "Manage in customer panel".
Add domain
Here you can add a new domain. You can directly assign this to a subscription or alternatively to a customer.
Add subdomain
With subdomain you can add a subdomain to an existing domain.
Add domain alias
Domain aliases are domains that point to an existing domain and its content. It is therefore possible to create a domain that has the same content as another domain.
Change status
Here you can block, deactivate or reactivate a domain. When deactivated, the page is completely blocked and no longer reachable (exception: via FTP clients and the File Manager). Visitors see the default page of the Webhosting. The email service is also not available in this case. When blocked, the website will not be reachable and visitors will be redirected to the error page defined by the user with the HTTP error code 503. The email service remains available.
Remove
By clicking the "Remove" button, you can delete a domain completely. Caution: This will irrevocably remove all data for the domain, including content on the web space, email addresses, associated applications and databases, etc.
Subscriptions
The "Subscriptions" area allows you to add subscriptions, change the service package of a subscription, change the subscriber, i.e. the customer to whom the subscription is assigned, as well as change subscription status or remove subscriptions.
By clicking on a created subscription in the list, you will go to the administration of the subscription in Plesk. Please note that you are actively working with reseller rights, so you can make more changes than the customer may be able to according to the applied service package. Alternatively, you can also view and manage the subscription like a customer by clicking "Manage in customer panel" in the list.
As a reseller, you have the option to change the package / add-ons or adjust the subscription independently of the service package in the "Account" box on the right in the subscription.
Add subscription
Here you can add a subscription. A subscription always has a main domain name, which you specify here. Furthermore, depending on the assigned service package or granted permissions, it is possible to add additional domains later.
As username and password, enter the access data for the subscription here, i.e. the data to access the hosting via FTP (and possibly SSH if activated later).
You can also select the service plan and (if created) add-ons to be assigned to the subscription.
Change package
With "Change Package" you can assign a new service package or add or remove add-ons to the selected subscription.
Change subscriber
This function can be used to transfer ownership of the subscription to another customer.
Change status
You can block or reactivate a subscription here. When the subscription is blocked, the included websites and email addresses will not be reachable or usable.
Remove
This will irrevocably delete a subscription including all content.
Service packages
Under "Service Packages" you can create, clone and remove service packages, as well as add so-called "add-ons" which can extend existing service packages with services.
By clicking on an existing service package in the list, you can edit it. If possible, the existing subscriptions will be synchronized with the changes.
Add package
With "Add Package" you can create a new service package and configure the intended services and permissions. For information on the resources and permissions that can be set, we recommend consulting the Plesk manual.
Clone package
The "Clone Package" function allows you to clone an existing service package. This is particularly useful if you only want to adjust some settings from an existing package.
Add add-on
Add-ons represent individual extensions of a service plan. The correct use of an add-on is best described using an example:
For example, if you have a customer with a subscription that allows five additional FTP users according to the service package, and the user actually needs ten, you basically have the following options:
- You add five more FTP users to the entire service package (and thus to all subscriptions based on it)
- You manually modify the customer's subscription with your reseller rights in the customer panel, in which case the subscription will no longer be synchronized with the associated service package, which is usually not the desired state
- You add the five FTP users as an add-on. The user then always has five more FTP users than allowed in the subscription, as long as the add-on is assigned to them.
The latter option is implemented with an add-on. Via the "Add Add-on" button you can define such an add-on.
Remove
With the "Remove" button you can remove created service packages / add-ons.
Tools & Utilities
Summary report
The summary report shows the resource usage of your entire plan. You can see at a glance, for example, how much storage space you are using, how much traffic you have generated and how many domains have been created.
IP addresses
Here you will find an overview of the IPv4 and IPv6 addresses included in your plan.
Application Vault
Here you will see all applications installed within your reseller hosting plan. Please note that you can only see applications here that were installed via the Plesk application installer in the hosting. Manually installed applications via e.g. FTP upload are not listed here. Please see WordPress applications via the "WordPress" menu item on the left.
Template for virtual hosts
Here you can define which files should exist by default on the web space of a new subscription. This gives you the opportunity to further whitelabel our interface.
Traffic usage by customers
Here you can view the traffic used by each customer.
Traffic usage by domains
Here you can view the traffic used by each domain.
Resource usage by domains
Under this option, you can see the resources used, broken down by domain.
Backup Manager
The Backup Manager is suitable for creating a backup of your entire reseller hosting, including all subscriptions. First, it is necessary to define a remote storage with FTP(S) on which the backups are to be stored. You can do this under "Settings for Remote Storage" -> "FTP".
You can then configure regular backups via "Schedule" or start a manual backup via "Create Backup". The Backup Manager can also be used to restore a backup. As long as your customers have the appropriate permission in the subscription in the service package, they can also independently restore backups created by you as a reseller.
It is also possible for you to restore via the Reseller Backup Manager by clicking on the desired backup.
Active Plesk sessions
Here you will see who is currently logged in to the Plesk interface. If necessary, you can cancel sessions so that users have to log in again.
Active FTP sessions
Here you can see who is currently connected to the reseller Webhosting via FTP. If necessary, you can also cancel sessions here.
Plesk Branding
Under "Plesk Branding" you can change the text displayed in the browser tab in Plesk as well as the logo in the top left.
Interface settings
Here you can change the language of the Plesk interface. You can choose between German and English. You can also determine whether a user is allowed to open multiple sessions at the same time, i.e. log in to Plesk multiple times.
You can also change the user interface. In the power user view, however, you cannot manage customers, resellers and their domains. Therefore, this view is primarily suitable if you only want to use the reseller hosting for yourself.
Custom buttons
The "Custom Buttons" allow you to add links to other websites in appropriate places in Plesk. Resellers can use this, for example, to integrate Plesk into their own environment.
WordPress
Here you will find the "WordPress Toolkit". With this functionality included in Plesk, you can centrally manage all your customers' WordPress installations. For example, you can perform new installations or removals. You can install updates, plugins and themes, and much more.
My profile
Profile
Here you will find your personal data. This is taken from the customer data at netcup.
Change password
Here you can change the password for your Plesk reseller access. With the changed password you can access your reseller plan directly via the whitelabeled URL of the Plesk interface.
Interface settings
Here you can select the language of the user interface (German / English). You can also determine whether a user is allowed to open multiple sessions in the web interface. Finally, you have the option to choose the user interface type. Here you can choose between the standard "Service Provider View" and the "Power User View".
The power user view is best suited for companies / individuals who only want to host websites and emails for themselves: Managing customers is not possible via this. However, creating websites and email accounts for the reseller themselves is particularly easy and intuitive.
Instructions for end customers
If you have any questions about how to operate the reseller Webhosting from a customer's perspective, we recommend consulting our article on Onyx Webhosting. Apart from the design and functions in the CCP, the same functionality exists.
Further resources
For further questions, the official Plesk manuals can be helpfiö, especially the Reseller and Customer Guide. You can find them here:
- Reseller Guide: https://docs.plesk.com/en-US/onyx/reseller-guide/getting-started-with-plesk.70426/
- Customer Guide: https://docs.plesk.com/en-US/onyx/customer-guide/getting-started-with-plesk.69259/
Frequently asked questions
What options are there for whitelabeling in reseller Webhosting?
Basically, all content is accessible via the neutral host name "webhosting.systems". Currently it is not possible to customize the colors of the design, as the Plesk control panel used for the hosting does not offer this option for resellers via the web interface.
You also have various options for whitelabeling in the Plesk interface for your customers:
- Customize template for virtual hosts: With this option you can determine what content a newly created subscription should normally have. By editing the files under "error_docs", for example, the error pages (e.g. 404 Not Found) can be customized.
- Plesk Branding: Here you can add any text to the browser tab title and set your own logo.
- Custom buttons: Here you will find many options that allow you to place links to your own websites in appropriate places in Plesk.
Can I only access the reseller Webhosting as a reseller via the CCP? Is it also possible to access directly via the Plesk interface?
Yes, this is possible. To do this, click "Change Password" next to the plan in your Customer Control Panel (CCP) and set a password.
I have an exclamation mark in front of a subscription / the subscription was not synchronized with the service package. How can this be resolved?
First, it is important to explain what "unsynchronized" means in this context: An unsynchronized subscription deviates from the settings of the service package. Usually the reason is that you exceed the limits of your plan with us, which is not permitted, or that manual changes have been made to the subscription by a reseller (or administrator). This locks the subscription for synchronization, otherwise these changes would be overwritten again by a synchronization.
As long as the subscription is unsynchronized, changes to the permissions and settings of the service package will no longer be applied to the subscription.
If you want to apply the settings of the service package to the subscription again, proceed as follows:As a reseller, go to the affected subscription by clicking "Subscriptions" on the left, then clicking the name of the existing subscription in the list. You will now find a link called "Synchronization" at the bottom right in the "Account" box. Clicking this will attempt to resynchronize the subscription with the service package. This will either complete successfully (the exclamation mark will be replaced by a check mark), or fail with an error message.
In this case, you must adjust the service package values so that they are compatible with your plan with us. The plan limits of the netcup plan must be distributed across all your subscriptions so that you do not exceed them in total. You can then restart synchronization under "Subscriptions" -> click on the subscription -> "Synchronization" (bottom right in the "Account" box).